For small and medium-sized business owners looking to establish a robust online presence, WordPress is an excellent platform to consider. It’s user-friendly, highly customizable, and scalable, making it a top choice for businesses of all sizes. If you’re new to WordPress and wondering where to start, this guide will walk you through the basics to get your website up and running.
1. Understanding WordPress: What Is It and Why Use It?
WordPress is a content management system (CMS) that allows you to create and manage your website easily. It’s open-source, which means it’s free to use, and it’s supported by a large community of developers. WordPress powers over 40% of all websites on the internet, making it the most popular CMS available.
Key reasons to choose WordPress for your business include:
- Ease of Use: No coding skills are required to manage your site.
- Customization: Thousands of themes and plugins allow you to tailor your site to your specific needs.
- SEO-Friendly: WordPress is built with search engine optimization in mind, helping you rank better on Google.
- Responsive Design: WordPress sites are mobile-friendly, ensuring a great user experience on any device.
2. Getting Started: Choosing a Domain Name and Hosting
Before you can start building your WordPress site, you’ll need a domain name and web hosting.
- Domain Name: Your domain name is your website’s address on the internet (e.g., www.yourbusiness.com). Choose a name that reflects your brand and is easy to remember.
- Web Hosting: This is where your website’s files are stored. For WordPress, it’s essential to choose a hosting provider that offers WordPress-specific features, such as one-click installation and automatic updates. Popular choices include Bluehost, SiteGround, and WP Engine.
Once you’ve secured your domain and hosting, you can install WordPress with just a few clicks using your hosting provider’s control panel.
3. Installing WordPress: The First Steps
After setting up your domain and hosting, the next step is to install WordPress. Most hosting providers offer an easy one-click installation process:
- Log into your hosting account and navigate to the control panel.
- Find the WordPress installer (often under a section labeled “Website” or “WordPress Tools”).
- Click the install button and follow the on-screen instructions. You’ll need to choose your domain, set up an admin username and password, and select your site’s title.
Once the installation is complete, you’ll receive a link to your WordPress dashboard, where you can start customizing your site.
4. Choosing and Customizing a Theme
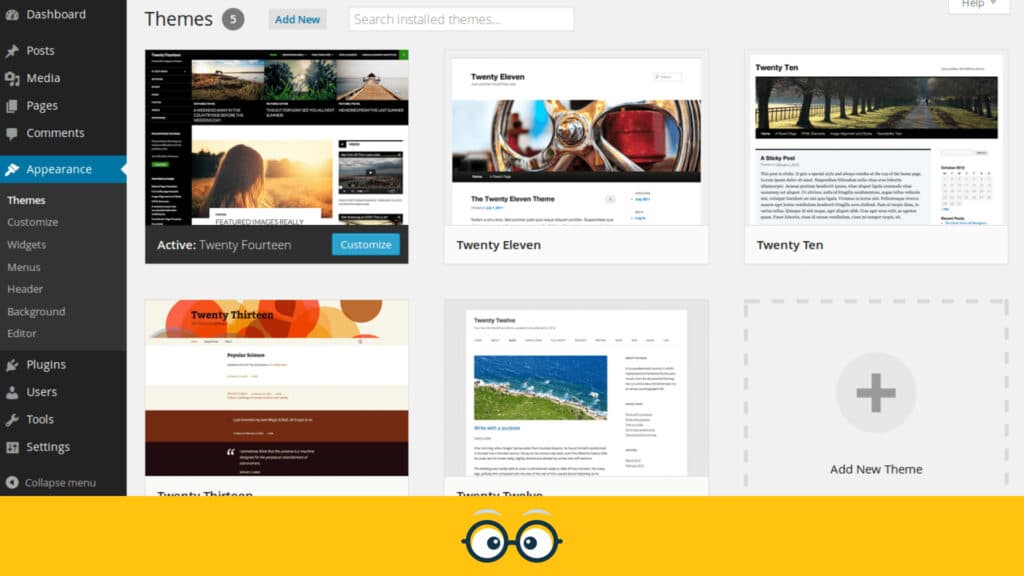
Your website’s theme determines its overall look and feel. WordPress offers thousands of free and premium themes to choose from, catering to various industries and design preferences.
- To choose a theme: Go to Appearance > Themes in your WordPress dashboard. You can browse available themes, preview them, and activate the one that best suits your business.
- To customize your theme: After activating a theme, you can customize it by going to Appearance > Customize. Here, you can change the colors, fonts, layout, and other design elements to align with your brand.
For more advanced customization, you can use a page builder plugin like Elementor or Beaver Builder, which allows you to create custom layouts and design elements without any coding.
5. Adding Essential Plugins
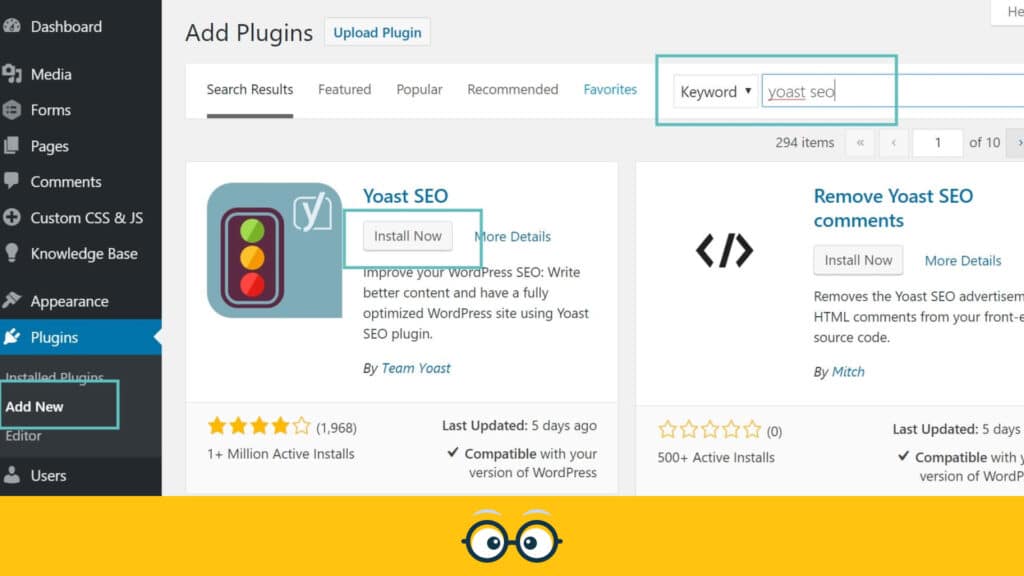
Plugins extend the functionality of your WordPress site. Whether you need contact forms, SEO tools, or security features, there’s a plugin for it.
Here are a few essential plugins for business websites:
- Yoast SEO: Helps you optimize your content for search engines.
- Contact Form 7: Allows you to add contact forms to your site.
- WP Super Cache: Improves your site’s loading speed.
- Wordfence Security: Protects your site from malware and hackers.
- WooCommerce: If you’re setting up an online store, WooCommerce is the go-to plugin for e-commerce.
To install a plugin, go to Plugins > Add New in your dashboard, search for the plugin by name, and click Install Now. After installation, click Activate to start using the plugin.
6. Creating Content: Pages and Posts
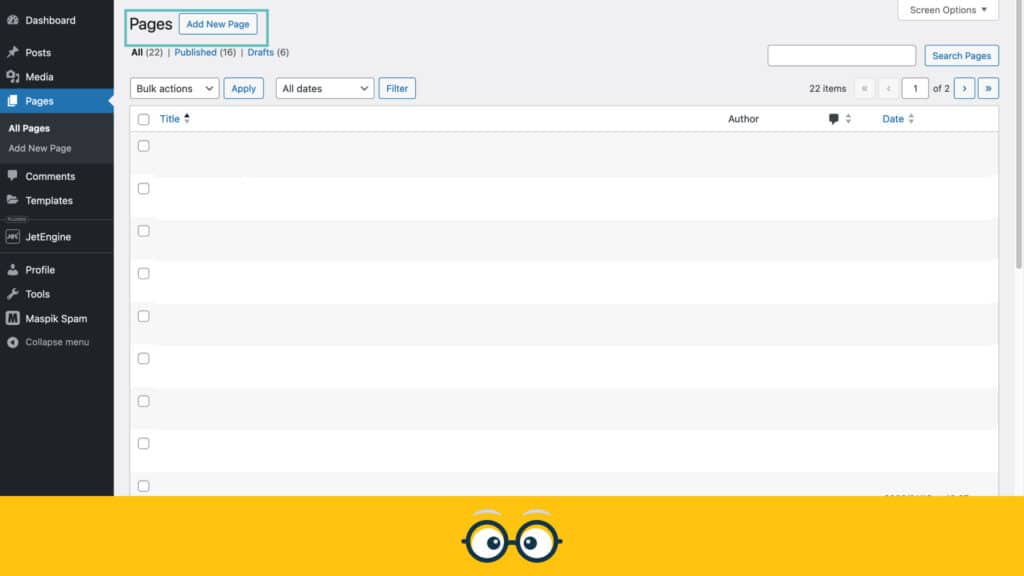
WordPress allows you to create two types of content: Pages and Posts.
- Pages are used for static content, such as your homepage, About Us, Services, and Contact pages. They are usually linked to your site’s main navigation menu.
- Posts are used for blog entries or news updates. They are displayed in reverse chronological order on your blog page and can be categorized and tagged.
To create a page or post, go to Pages > Add New or Posts > Add New in your dashboard. Use the block editor to add text, images, videos, and other media. Once you’re satisfied, click Publish to make your content live.
7. Managing Your WordPress Site
Once your site is up and running, it’s important to manage it effectively:
- Regular Updates: Keep your WordPress version, themes, and plugins up-to-date to ensure security and performance.
- Backups: Regularly back up your site using a plugin like UpdraftPlus to prevent data loss.
- SEO: Optimize your content regularly using SEO plugins and monitor your site’s performance with tools like Google Analytics.
- Security: Implement security best practices, such as using strong passwords, enabling two-factor authentication, and installing security plugins.
8. Launching Your Site
Before you launch your site, take some time to review everything:
- Test your site on different devices to ensure it’s responsive and functions well across desktops, tablets, and smartphones.
- Proofread your content to eliminate any typos or errors.
- Check all links and forms to ensure they work correctly.
Once you’re confident that everything is in place, it’s time to go live! Share your new website with your audience through email, social media, and any other marketing channels you use.
Conclusion
Getting started with WordPress is a straightforward process, even for beginners. With its flexibility, ease of use, and powerful features, WordPress provides a solid foundation for your business’s online presence. By following this guide, you’ll be well on your way to creating a website that not only looks professional but also supports your business goals.


